
Home » Lorex Surveillance » Lorex LW2772H Wireless 720P 7″ Touch Screen Video Surveillance System (Black)
")


Reg. Price
Sale!
399.99
* Discount only for limited time, Buy it now!

"This Best Selling Lorex LW2772H Wireless 720P 7″ Touch Screen Video Surveillance System (Black) Tends to SELL OUT VERY FAST! If this is a MUST HAVE product, be sure to Order Now at Amazon.com to avoid disappointment!"
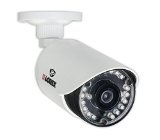
Lorex LW2772H Wireless 720P 7" Touch Screen Video Surveillance System (Black)
- 7" rechargeable wireless touch screen LCD monitor
- Weather resistant wireless cameras
- Record video up to 720p HD with audio
- 2-way audio Intercom
- Expandable up to 4 cameras
Monitor your home or business with the wireless monitoring solution. Get the capabilities of a full surveillance system with simplified installation and secure wireless video, and 2 included video/audio cameras (expandable up to 4 cameras). View live and recorded video directly on the monitor - protect your home, business or property by recording video with audio to the included 8GB SD card (expandable up to 64GB). Featuring a rechargeable wireless LCD monitor for truly portable use and touch controls making the monitor simple to use.

List Price: $ 399.99
Price:

|

|

|

|

|

|
 "Pin It")
|
What customers say about Lorex LW2772H Wireless 720P 7″ Touch Screen Video Surveillance System (Black)?
Find Product
Hot Deals!
 ")    ") |
Popular Products
- Lorex LNR1182TC8B 8 Channel 2TB Cloud Connect with 8 x 1080p HD Cameras (Black)
- Lorex LNC216 Wireless HD Dual Lens Network Camera with Real-Time HD Resolution (Black)
- Lorex 720P 1MP up to 130Ft NV IP66 2PK Bullet Camera LBV1521
- Lorex Technology LH12654 Surveillance System With 4 Security Cameras And 8 Channel DVR
- Lorex LNR4082TC8B 8-Camera 1080p Security System w/ 2TB DVR
Online Shops

The Lorex LW2772H is a Professional, Simple-To-Use Video Surveillance System that Provides Security and Peace of Mind!,
My parents live in a well-to-do, upper middle class neighborhood in Maryville, Tennessee, near Knoxville; it has recently been targeted by vandals and burglars. Dad carries a loaded gun everywhere he goes because of an increase in violence. Nevertheless, for years, they have been wanting a video surveillance system. When I was visiting him during my Thanksgiving holiday, my eighty-one-year-ancient dad installed, without any help, the Lorex LW2772H Wireless 720P 7” Touch Screen Video Surveillance System (Black).
The most hard part was installing the cameras. They are weather resistant, not weather proof. They must be mounted beneath the roof eaves; they can not be in constant contact with rain, snow and sleet. Also, there must be an available, reachable, electrical outlet for plugging in the camera’s power adapter. My dad is an electronics engineer and was able to accomplish this without much difficulty. He has his own tool shop in the basement and had the tools necessary for mounting the cameras.
The Lorex LW2772H has two cameras that come with it. Two more can be added. Dad installed one camera outside the basement garage door; he wanted to maintain surveillance on the backyard’s concrete patio and wooden deck. He installed the other camera outside the main garage door on the first level of his home; he wanted to have a view of the driveway in order to see who is coming for a visit, welcomed or not. Mom and Dad have a gorgeous cat, Angel, that they adopted; originally, Angel was a stray that kept coming to the sliding glass doors on the wooden deck, begging for food. Dad uses the cameras to help keep track of where Angel is playing in the yard. She is an indoor/outdoor cat. Sometimes she wanders into neighbors’ yards and my parents don’t like that
When I visited my parents for a long Christmas break, every morning, around 6:00 A.M., I would take Angel for a walk on the street upon which they live. My parents would also be up, preparing an early breakfast, and would watch me on the receiver’s LCD monitor as I walked along the backyard and came around the front, carrying Angel in my arms. Despite the darkness, they could clearly see the “two intruders - one carrying the other.” The picture on the monitor is surprisingly clear and bright, especially during the day, and we can hear passing cars and birds singing. The picture and the audio on the LCD monitor are fantastic. The receiver reminds me of a GPS in its size and shape.
On the receiver, the first thing Dad did was raise the two insect-like antennas for better reception. Next he installed the battery. IT MUST BE CHARGED FOR TEN HOURS BEFORE INIITIAL USE. A power adapter must be connected from the receiver to an electrical outlet in order to charge the battery. After fully charging it, Dad installed the SD card and formatted it per the instructions in the booklet that he downloaded from Lorex‘s website. An 8 GB SD card came with the Lorex LW2772H. This allows 32 hours of single channel recording in VGA resolution or 16 hours in 720p resolution.
For longer recording, use an SD card with more memory (up to 64GB); select Motion Recording for your Recording Mode (simply tap the purple man located at the screen’s lower left-hand corner). The receiver will record only when it detects movement instead of continuous or according to a pre-selected schedule. Also, one must set the recording time (from fifteen seconds to one minute) for recording after motion has been detected. Sensitivity must be configured in order to prevent fake triggers such as a branch moving in the wind. This is all accomplished through the Main Menu icon in the lower right-hand corner. In order to watch and delete files that are made when motion is detected, one must go to the SD card icon located in the screen’s upper left-hand corner. Furthermore, the SD card can be removed and inserted into a PC or MAC for viewing files.
The receiver for Dad’s Lorex LW2772H is kept on the kitchen counter on the first floor of their home. One camera, the one positioned outside the basement garage door, is located at a fantastic distance. The other is located not far away, outside the main garage door on the first floor. But, the screen can be easily divided so that the views from both cameras can be seen side-by-side. Simply tap the screen and hold your finger for a couple of seconds. Dad prefers to have Camera 1 only showing which allows him to clearly see whoever is driving in the driveway. But, you can alternate between Camera 1 and Camera 2. I prefer both cameras on show (tap the Quad icon which is also located at the left-hand corner in the screen’s bottom). Nevertheless, both video displays from both cameras are equally the same, bright and clear, as though they were both located near the...
Read more
Was this review helpful to you?

|Useful, but super slow, ancient tech touch screen ruins it. Also questionable weather resistance.,
Just over a month ago, I was offered a Lorex LW2772H Wireless Touch Screen Video Surveillance System for review, and I accepted. I am not an expert on video surveillance systems, in fact, this is my first experience. But, I am a professional computer and electronics expert. I come from the point of view of how useful, responsive and user friendly this system is.
First, the setup. It was really very simple technical wise to get the system up and running, but mounting the cameras and routing their power cables will be the problem for most - more on that later. The box contains the two video cameras, the 7" touch screen/receiver, three power adapters, mounting screws for the cameras, the battery for the touch screen/receiver, an 8GB SD card and an ethernet cable. I didn't even bother opening the quick-setup pamphlet that came with the system until after I was already done setting the whole thing up. I started by installing the 3.7V, 2000mAh Lithium Polymer battery into the touch screen/receiver. This is accomplished by removing two small phillips head screws to remove the battery access door, then plugging the power lead into it's socket, then closing the battery door and screwing it shut again. The screws are pretty small and I used a jewelers type screwdriver, which is not included. I inserted the included 8GB SD card into the slot on the touch screen/receiver. I then found the one power adapter that is made to fit the touch screen/receiver and plugged it into it and a power outlet. I turned the screen/receiver on, by long pressing the power button on top. It booted up and since I hadn't powered up a camera yet, of course nothing much was happening on the screen. I then powered one of the cameras on using one of the two camera power adapters and placed it in my house for testing. It immediately made contact with the screen/receiver and it's live video image showed up there. I did the same for the second camera, placing it on another floor of the house and it also made contact with the screen/receiver and it's live video image showed up. The only thing left to do was to plug in the ethernet cable into one of my switches and it got on the internet within about ten seconds. So even though the cameras communicate wirelessly to the touch screen/receiver (and they do that on their own network, outside of your wireless network), the touch screen/receiver does not communicate wirelessly to the internet and must be connected to your network via an ethernet cable if you wish to use your iOS or Android phone/tablet with the system. More on that later.
Physically, the touch screen/receiver is simple to hold, it has two nice rubber feet on the bottom and a fold out kickstand to keep the screen at a nice angle for viewing or making selections. The power and ethernet connections are on the back along with the battery compartment door and the speaker. Along the top are two, fold-out antennas and the power button. Along the right side is the SD card slot, a volume rocker, a push-to-talk button and a power indicator light (which doesn't function as you may expect). The power light only blinks when the battery is low or when you place the device into scan mode - otherwise it does not light up.
Now for the touch screen interface. The screen is really the main receiver. It acts as the hub of the system and everything works through it. Since it is the system hub, the screen/receiver must be powered on for the system to function at all. Unfortunately, the touch screen/receiver has some major issues. First of all, the touch screen is of an ancient type (I believe it is a resistive touch screen) and it does not respond to light touches that you would use on a modern smartphone or tablet (which use capacitive touch screens). You need to press that sucker hard for your touches to register. Second, the user interface is super duper slow and slugglish. My guess is that they traded responsiveness for battery life and/or low cost. So do not expect an experience anything like you may be used to on your phone or tablet. That said, the interface is simple to use with icons reminiscent of older GPS devices. There's not a whole lot of color and most of the interface is white on blue, or blue on black. Basically, you should set up the date and time and then format the SD card to get started - all acomplished though simple requesters. There's really not a whole lot of options. There is a network section where you can select either DHCP, which is the default, or set up a static IP address. There is a section for setting the cameras to 720p or VGA. There is a section for setting the recording duration for motion detected recording, setting up a recording schedule and file overwrite options. There are a few more things, but what you need to know is that the system is very basic, simple and yet clunky and slow to use.
The default image shows the live feeds from...
Read more
Was this review helpful to you?

|Lorex Wireless Two Camera Security System,
If looking for a wireless security system, by that I mean completely wireless cameras, this is not the set. These cameras must to be plugged into an electrical outlet. When the term “wireless” is used here it means the cameras are communicating wirelessly but need electrical power. They are not battery operated.
Granted, installation is simpler to accomplish than with a full-blown security monitoring multi-camera set-up where each device must be wired through walls and ceilings with each camera’s wire converging in one spot, often an attic or basement, where all are plugged into a DVR.
Installing this two indoor/outdoor camera system is simpler than that but not necessarily distress free, particularly if the cameras are to be used outside and concealing the power cable is desired.
Included are two cameras (no zoom or pan and scan capability,) a seven inch touch screen monitor, AC adapter power cables, an Ethernet cable, a 8GB SD card for recording (may be expanded up to 64GB card) a Lorex security window sticker and a Quick Start Guide.
First step is to open the battery compartment (standard small Phillips (cross) head screwdriver is needed – same size as required for most toy and small device battery compartments) to remove barriers to charging. Then charge the monitor for ten hours – once charged it can stay plugged in or may run on battery power alone for two and a half hours before needing a charge.
From there, change the time zone and set the date and time. Camera setup is simple – plug each camera (two included and up to two more may be added) into an electrical outlet and a signal is picked up by the seven inch monitor and the picture from each camera is showed.
The design of this system (cameras that plug into the wall and a show screen) is similar to a baby monitor. There is a two way talk feature which includes built-in microphones in the cameras and monitor so whomever is on-camera can simply talk toward the camera to identify themselves.
Questions can be questioned, ID held up to the camera, etc.to reassure before deciding whether to open the door or not. The monitor has a microphone icon which is when tapped is activated, tap again to deactivate.
Although the Quick Start Guide states the monitor must be connected to a wireless router it really only needs to be connected to an Ethernet network with internet connectivity. The cameras and monitor connect wirelessly with one another without the need for an external wireless router. I connected the two cameras to the monitor with my wireless router turned completely off. And, I was also able to use the remote apps (see below) when connected to my wired internet network.
Apps. The app for my iOS device was downloaded from the App Store Lorex SD Pro. Started it up and it detected the device, when selected it questions for device ID or to scan the QR code on the back of the device, which I did and it worked instantly. Then it questions for the default password contained in the Quick Start guide – 000000 -- then it questions for an actual password to be established for use to access the system from a remote location.
When the app is started a device list appears and it shows the picture from the camera on channel 1 and states the quality (excellent) and tells you the resolution. You can switch to the other camera but cannot view them at the same time. The app works anywhere whether at home or anywhere an internet connection is available
Frequently these types of apps only work when both the mobile device and the cameras are connected to the same home network. Further configuration is usually required to access them separately from the internet – not the case here. This app works anywhere so all the internet access and configuration are handled automatically – a huge plus.
Next I loaded the android app from Google Play by searching for Lorex SD Pro.and completed the same steps mirroring the iOS device except I now had a real password, which I typed in and was set.
I connected the android and iOS devices but up to three separate devices can run at the same time – all viewing the cameras remotely. I am attaching a picture of the iOS and android devices both viewing the security cameras remotely at the same time.
Back to camera installation. From the Quick Start Guide and on-line material it appears the manufacturer expects an outlet to be installed outside by the camera. This may or may not be practical, and may require the services of an electrician. My outdoor outlets are a foot from the bottom edge of the house. To be effective for this application they should be up at the top of the wall by the camera.
I hoped to hide the cable, making installation more secure by going through the exterior wall to the interior side, leaving only the camera...
Read more
Was this review helpful to you?

|